Tuesday, December 20, 2011

Handmade Bracelets

My last DIY Christmas gift was for my little sister who is 12.  Unlike me at that age, she is a girly girl.  A glitter in her veins kind of girl.  And, I won't lie, my mom let her start to wear make up at an early age, so she has had lots of practice. 
I'm not sure if I explained the gifts my husband and I are giving this year.  We are buying some gifts, but we are making at least one gift for everyone.  So, for my sister, I bought her a really cute brown shirt that can hang off of the shoulder.  The gift that I made for her, if you couldn't tell by the name of the post, was bracelets.  I didn't make a tutorial because I actually had to find a tutorial for one of the bracelets.  Here is the link for the tutorial I used.  And, here is the final bracelets. 
I love the one with the pearls on the bottom.  It looks so delicate.

This bad boy took almost 2 days to  make! 

Great Last Minute Gift

One of my favorite gifts I have received over the last 4 years, has been from my mother-in-law.  What is it?  A magazine subscription.  The first 2 years, she bought me Southern Living.  The last 2 years, she bought me Real Living.  I love this as a present and the best thing is, I look forward to getting my monthly present and I always remember that she got it for me.  I even call her every time I get a new magazine and thank her.  So, for anyone still looking for a small gift for pretty much anyone, I would recommend a magazine subscription.  Here and here are a couple of websites that sell them relatively cheap.

Sunday, December 18, 2011

Funny Onsies

My sister had a baby back in November and I still wanted to get the baby a little something.  But, with the baby being less than 9 weeks old, what do you get him?  A funny onesie! 
I was wanting the onesies to be black, so I went to Hobby Lobby and purchase two.  Now all I needed was two funny sayings.  The problem was I couldn't decide which sayings to use.  Here were the saying I liked.
  1. I'm cute.  My mom's cute.  My dad is just lucky!
  2. Sorry Angelina, I'm taken.
  3. I'd rather be with my aunt.
  4. I drink until I pass out, like my daddy.
  5. Photo with baby $0.25.  Saving for my college fund.
  6. I just got here and I'm already awesome!
  7. My aunt feels guilty for living so far away.  So, I got this shirt.
I sent out a few text messages to ask my mom, friend, and husband which two sayings were their favorites.  The bad thing was they all chose different ones.  My mom liked #1 and #2.  My friend liked #4 and #6.  My husband liked #3 and #5.  So....since that was not helpful at all, I posted on my facebook (but hid the post from my sister, her husband, and my older nephew).  I got a lot of #1, #2, #4, and #6.  So, which ones did I choose?
The sayings after I printed them onto the transfer paper

I have never actually showed the process of doing the shirts in the past.  So, here you go for those who want to see it.....
Me trying to type the sayings up on my "paint" program

Me "trying"to take the backing off of the transfer paper
 

Place the transfer on the shirt....I wish I would have cut out around the letters better

place the rice paper over the transfer paper

set a 2 minute timer

constantly move over the rice paper and transfer paper for the 2 minutes

completed shirt.  Once again I wish I would have cut around the letters more

second shirt.  Much better!


Saturday, December 17, 2011

Book Club Gifts

As much as I would like to be creative, I am willing to be crafty.  I say this because over the last couple of weeks I have done a bunch of crafting, but it has mostly been coping great ideas off of pinterest.  But, I am ok with that (for now) because there are some awesome ideas on there. 
Two of the great ideas I have found off pinterest were these babies.
For website, click here

For website, click here
These were perfect for the book club I am in.  This was all I needed.

Bag of cheap Gummy worms, plastic baggy, staples, and cardstock with saying on it

just "ONE" book, tape, hot glue gun and sticks, and some type of ribbon/yarn

There really is not a lot of explanation needed for the gummy worms.  Pretty much stick them into a bag and staple the saying on the top to attach it to the bag and to close the bag up.

For the ornament, I will not lie, each ornament took me a good hour or so to make.  So, yes they were time consuming.  It was a lot of trial and error to get the size I liked.  I recommend cutting the page down in halves three times for the bigger outer layer and four times for the inner layer.  You roll each section into "cones" and tape to hold in place.  I then made a square out of a page of the book and glued the larger cones to it.  I only have pictures of the first one I did (and for some reason I used tape to adhere the cones to the square and it was much much bigger) but, definitely use glue.  It is so much cleaner and doesn't weigh as much.  I made a whole on the back square piece and threaded the "ribbon" through it and made a knot.  Easy peasy.

This is only halved twice.  I have each of these again for the outer layer.  Then halves that sized once more for the inner layer. 

Roll them in a "cone" shape

tape the "cone" in place

in this picture, I taped the cones down.  But, in the ornaments I gave away, I hot glued them down.  Plus, in this picture I used a larger piece of paper than the piece of paper I used in the ornaments I gave away.

Once you get into doing this, you will come up with your own technique to glue them into place. 

Here is one of my completed ornaments I gave away.  I tied the ribbon (that hangs the ornament from the tree) to the back "square" piece


Thursday, December 15, 2011

Labels

I am so addicted to Pinterest.  I think I have wrote about needing an intervention for this addiction before, but it has gotten worse.  I have been pinning printables like crazy especially with Christmas right around the corner.  I have been trying to track down cute Christmas tags.  I have had this printable pinned for a while now.  Since I have been making one gift per person this year, it would be perfect if it were more Christmas themed.
So, I set out to make my own.  I found this blank template for printables. 
I used the paint program that comes with most computers and added a Merry Christmas and changed up the colors and it was that simple.  What do you think?

Sunday, December 11, 2011

Christmas Craftapaloosa 2011

My friend Brooke, is one of those people who will come up with the best ideas.  Sometimes she comes up with the craziest ideas.  And sometimes she comes up with ideas where you just don't know if you want to go along with them.  I have learned to just go along with any of her ideas.  Because even if something does not sound fun....it some how always ends up being a blast.
On Saturday,I did not doubt the fun to be had. She planned a craftaploosa.  She found three great crafts (that she found on pinterest, got to love pinterest).  She invited friends and family.  And being the organized super mom that she is, set up organized craft zones, pre-practiced the crafts, and simplified the crafts.  Once again, I am not going to reinvent the wheel, but I do want to tell you what we did to prepare and some of the things we tried that didn't work out.    So, to start off, we did the snowflakes from toilet paper roll ornaments.  Here is the inspiration and the website we tried to copy.
Add caption
  This was a really easy craft.  The hardest part about it was painting it.  The other day Brooke and I practiced the crafts and we tried to spray paint the snowflake.  But, it was kind of a pain in the arse.  So, we decided to use acrylic paint.  Which actually worked fine.  It may have just been us, but it was hard to get enough glitter on without making it look all splotchy.  But, after looking at the inspiration picture right now, we obviously didn't use enough glitter.  So, here is my finished snowflake.  It turned out cute, but definitely needs more glitter.

Also, I obviously suck at cutting paper because my 5 pieces were not the same size which made it look like a 4 year old made the ornament.  I will still put it on my tree though.  As you can see we added a little something to the middle.  We did this because after assembling our practice ornament, it was not looking very good in the middle.  So we decided to add something to cover up the middle.  But, the lesson learned here is, you can never have too much glitter.
The second thing we worked on was the glittery ornaments.  Here is the inspiration and the website we copied.
This was probably the easiest crafts and came out exactly like the inspiration.  We tried the small glitter flecks that was used in the inspiration and the bigger flakes of glitter and I will agree that the small flecks of glitter looked better....for the most part.  Here is ours.
Brooke pouring the Mop N Glo into the ornament and swirling it around

gotta let it drip out

Adding a TON, TON, TON of Glitter.  The important word here is TON

some of our completed ornaments. 


this one had the bigger blue flecks and the smaller black flecks of glitter combined

The last craft was the most time consuming, but I think the prettiest one.  It was the letter with the berries glued on it.  Here is the inspiration and the website we got it from.

Friday, December 9, 2011

Personalized Coasters

Back on May 30th, I posted about doing coasters as presents.  Well, we decided that since we were going to be making wine glasses and mugs for my husband's parents, we might as well make them some personalized coasters too.  There are craftier ways to do this such as these three sites, but I wanted to do something quick and easy.  So, we purchased some transfer paper which is made for pretty much everything, especially tile, for $19.70.  If you would like to purchase the same kind check out my amazon store.  We also purchased the follow items.

  • 24x48 Cork Roll for 9.99
  • 25 Rialto Beige tile for $0.37 with ended up being $9.25
  • 3oz. bottle of Contact Cement for $4.97
  • 11.5oz can of gloss Helsmman urethane for $9.09
  • We had a can of satin already on hand
So, the total for everything for this project is going to be$33.30.  We have made 6 coasters for my husband's mother and 6 for my husband's father.  We made 4 coasters for my mother and 4 coasters for my sister.  Then we made 4 coasters for a friend and we had purchase 1 extra coaster to test out the whole process for ourselves.  We of course still have a bunch of cork, contact cement, urethane, and transfer paper left over.  The first thing we did was find a font that we liked from this website.  Then we sized it to the size we liked on our paint program.  From there, we printed them onto the transfer paper using the instructions on the package. Then cut them out.  There is one thing we would do different next time.  We would cut the letters out and do it the size of the tile itself, that way you can't see the edges of the transfer paper.  

Then we got a bowl of water and put it in the water for 60 seconds.  It was so fun watching them shrink up.

please ignore the mess in the background. 
After that we peeled the white backing off of the paper and placed it on the tile.

Once the transfer paper dries it will turn white and you will need to spray it with urethane.
While the urethane was drying we cut the cork and I just want to show you this huge pile of cork!
Once the urethane dried, we used the contact cement and glued the cork to the bottom of the tile.
Here are the completed tiles.  What do you think?


The coasters we are giving to a friend.  He is a Bangles fan


Thursday, December 8, 2011

Personalized Beer Mugs & Wine Glasses

So, like a large majority of people out there, my husband and I are making a handful of Christmas gifts.  I'd like to say we are doing it because we think there is more meaning behind it, but really it's cuz we po'.  I figured if we were going to be making gifts, I wanted something they still needed and still looked great.  So, for the next couple of days I am going to be sharing the gifts that we made for our family.
So, to start off, my husband's mom was really needing new wine glasses and his dad was wanting beer mugs.  What can I say, they like to party.  We decided we were going to get them some wine glasses and mugs and etch their last name initial on them.  So, after looking around I found wine glasses and beer mugs at The Dollar General for $1 dollar a piece!  If you are worried that they would be cheap, let me calm those worries, I accidently tapped one of the wine glasses against our tile countertop and it didn't break.  Score!  Other than the item you will be etching on (glasses, mugs, ornaments, frames, plates, etc.), you will need the following items.  I used Armour Etching cream, a small paint brush, an x-acto knife, and label paper.  You do can purchase a kit that has most of these items and stencils in it.  
 I couldn't find stencils of letters the size that I wanted, so we found one on this website that has 1001 free fonts.  We copied it and opened it up in our paint program.  Then we sized it to the size we wanted and printed it out onto the label sheet.  After that we painstakingly cut out the lettering using the x-acto knife.  You could always just use masking tape and free hand a letter and cut it out also if you do not want to purchase the labels.  We just had them on hand, so there was no cost to use them.  

Once we had the letter cut out, we peeled the backing of the label. To get them centered and in the same location on all of them, we took a scrap piece of paper the same length of the letter.  We used the thickness of the scrap piece of paper to determine how far down the letter was going to be by lining it up with the top edge of the glass and the top edge of the label.  We made sure to smooth down all bubbles that will allow for etching cream to get underneath. 
Then, we painted on the etching cream and I mean we gooped the stuff on.  This is not a time to get skimpy.  This is one of those times that less is not more! 
We patiently waiting while letting our etching cream sit for 10 minutes.
Then we rinsed the etching cream off.
And Viola'  beautiful!  Well, as close are we can get to beautiful.  What do you thing?

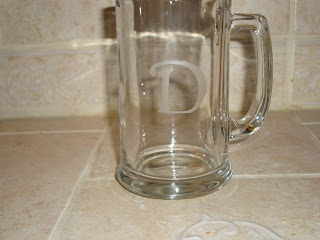
please ignore the crumbs on the countertop
Oh and check back tomorrow to see the next project we worked on! To see more gift ideas, check out my other DIY gifts